PowerPoint Slide Master Tutorial: Create Consistent Presentations
The Slide Master in PowerPoint controls the default fonts, colors, backgrounds, and placeholder positions for…
The Slide Master in PowerPoint controls the default fonts, colors, backgrounds, and placeholder positions for every slide in your presentation. Editing the Slide Master once applies changes across all slides instantly — eliminating the need to format each slide individually. A well-designed Slide Master reduces presentation production time by 60-70%. For PowerPoint fundamentals, see our PowerPoint tutorial for beginners.
Key Takeaways
- Access Slide Master view through View tab > Slide Master — the top slide in the left panel is the master that controls all layouts below it.
- Changes to fonts, colors, and backgrounds on the Slide Master automatically apply to every slide in the presentation — no need to format individually.
- Save your customized Slide Master as a template (.potx file) to reuse the same design across future presentations.
What Is the Slide Master and How Does It Work?
The Slide Master is a special slide at the top of the slide hierarchy that defines the default appearance for all slides — every layout and individual slide inherits its fonts, colors, backgrounds, and placeholder positions from the master.
The Hierarchy
| Level | What It Is | What It Controls |
|---|---|---|
| Slide Master | Top-level master slide | Global defaults: fonts, colors, background, logo |
| Layouts | Variations under the master | Specific arrangements: title, content, two-column, blank |
| Individual slides | Actual presentation slides | Content within the layout structure |
Changes flow downward: editing the Slide Master updates all layouts, which update all individual slides. You can override settings at any level — a layout can have a different background than the master, and an individual slide can override both.
According to Microsoft Support, every presentation has at least one Slide Master. You can have multiple masters in the same presentation for different design sections.
How Do I Open and Edit the Slide Master?
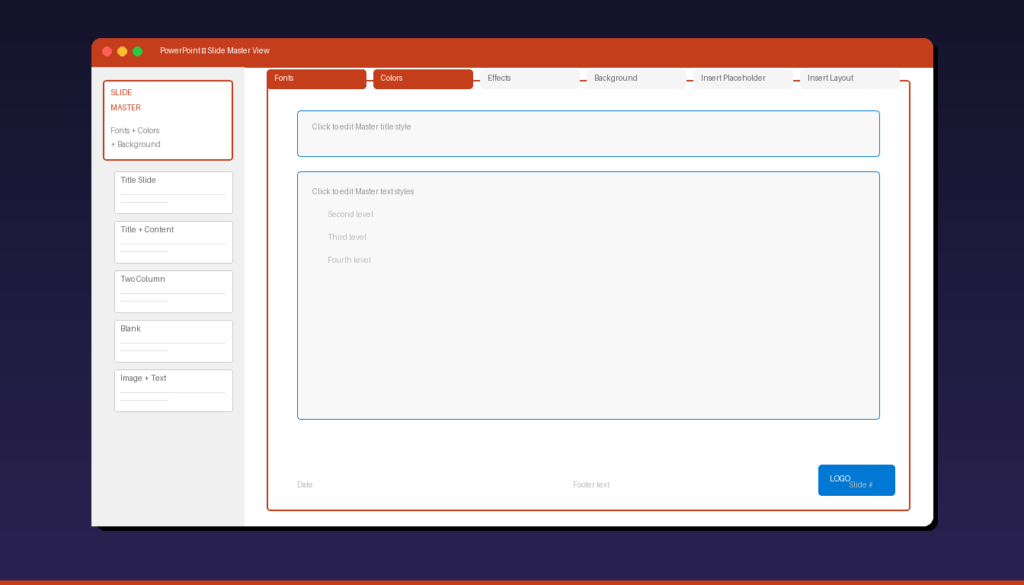
Go to View > Slide Master to enter Slide Master view — click the top slide in the left panel to edit the master, or click a layout below it to edit a specific layout.
- Open your PowerPoint presentation.
- Click the View tab.
- Click Slide Master in the Master Views group.
- The left panel shows the Slide Master (larger, at the top) and Layouts (smaller, indented below).
- Click the Slide Master (top slide) to edit global defaults.
- Make your changes (fonts, colors, backgrounds, logos).
- Click Close Master View when done.
What You Can Edit on the Slide Master
| Element | How to Edit | Effect |
|---|---|---|
| Fonts | Slide Master tab > Fonts > choose theme fonts | All text uses the selected fonts |
| Colors | Slide Master tab > Colors > choose theme colors | All color-dependent elements update |
| Background | Right-click > Format Background | All slides get the same background |
| Logo/image | Insert > Pictures > position on master | Logo appears on every slide |
| Placeholders | Click and drag to reposition or resize | All layouts inherit the position |
| Footer/date/slide number | Insert > Header & Footer | Appears on all slides |
How Do I Customize Fonts and Colors?
Click Fonts or Colors in the Slide Master tab to set the theme fonts and color palette — every text box and colored element in the presentation uses these theme values.
Set Theme Fonts
- In Slide Master view, click the Slide Master tab in the ribbon.
- Click Fonts.
- Choose a built-in font pair or click Customize Fonts at the bottom.
- Set the Heading font (for titles) and Body font (for content text).
- Click Save.
Set Theme Colors
- In Slide Master view, click the Slide Master tab.
- Click Colors.
- Choose a built-in color palette or click Customize Colors.
- Set colors for: Text/Background (Dark 1, Light 1), Accents (1-6), and Hyperlinks.
- Click Save.
Recommended Font Combinations
| Heading Font | Body Font | Style |
|---|---|---|
| Calibri | Calibri | Clean, modern (PowerPoint default) |
| Arial | Arial | Universal, highly readable |
| Segoe UI | Segoe UI | Microsoft design language |
| Georgia | Open Sans | Traditional + modern |
| Montserrat | Open Sans | Bold + clean |
Choose no more than 2 fonts for the entire presentation. Using theme fonts ensures that text remains consistent even if the presentation is opened on a computer with different fonts installed.
How Do I Create Custom Layouts?
In Slide Master view, click Insert Layout to add a new blank layout, then add placeholders and formatting to create a reusable layout for specific content types.
Add a New Layout
- In Slide Master view, click Insert Layout in the Slide Master tab.
- A new blank layout appears in the left panel.
- Right-click the new layout > Rename Layout > give it a descriptive name (e.g., “Two-Column with Image”).
Add Placeholders
- Click the new layout to select it.
- Click Insert Placeholder in the Slide Master tab.
- Choose the placeholder type:
| Placeholder Type | Best For |
|---|---|
| Content | Text, tables, charts, SmartArt (versatile) |
| Text | Text only |
| Picture | Image with click-to-insert |
| Chart | Chart with click-to-insert |
| Table | Table with click-to-insert |
| Media | Video or audio |
- Draw the placeholder on the layout by clicking and dragging.
- Resize and position as needed.
- Repeat for additional placeholders.
Delete Unused Layouts
Right-click any layout you do not need > Delete Layout. Removing unused layouts keeps the layout gallery clean and makes it easier for team members to choose the right layout.
How Do I Add a Logo or Watermark to Every Slide?
Insert the logo image on the Slide Master — it automatically appears on every slide in the presentation without needing to add it individually.
Add a Logo
- In Slide Master view, click the Slide Master (top slide).
- Go to Insert > Pictures > This Device (or from stock images).
- Select your logo file and click Insert.
- Resize the logo and position it (typically top-right or bottom-right corner).
- Right-click the logo > Send to Back if it overlaps placeholders.
Add a Watermark
- In Slide Master view, click the Slide Master.
- Go to Insert > Text Box > draw a text box.
- Type your watermark text (e.g., “CONFIDENTIAL” or “DRAFT”).
- Format the text: large font, light gray color, rotated 45 degrees.
- Right-click > Send to Back.
- Reduce opacity: Format Shape > Text Options > Text Fill > set transparency to 80%.
To exclude the logo from specific slides (e.g., title slide), edit that specific layout and delete the logo from it — the layout override takes priority over the master.
How Do I Save a Slide Master as a Template?
Save your presentation as a .potx template file — opening the template creates a new presentation with your Slide Master, layouts, and formatting ready to use.
- Finalize your Slide Master with fonts, colors, logo, and custom layouts.
- Delete all slides in Normal view (keep only the Slide Master and layouts).
- Click File > Save As (or Save a Copy).
- Change Save as type to PowerPoint Template (*.potx).
- Enter a template name (e.g., “Company Presentation Template”).
- Click Save.
Use Your Template
- Open PowerPoint > New > Personal (or Custom).
- Click your template to create a new presentation.
- All Slide Master settings, layouts, fonts, and colors are pre-applied.
Templates save in C:\Users\{username}\Documents\Custom Office Templates by default and appear in PowerPoint’s template gallery.
What Are Common Slide Master Mistakes?
The biggest mistakes are editing individual slides instead of the master, using too many fonts, and not removing unused layouts.
| Mistake | Impact | Fix |
|---|---|---|
| Editing slides instead of master | Inconsistent formatting across slides | Always edit in Slide Master view |
| Too many fonts | Unprofessional, cluttered appearance | Max 2 fonts (heading + body) |
| Not setting theme colors | Manual color picking on every element | Set colors once in Slide Master |
| Logo on every layout individually | Missed on some layouts, inconsistent position | Add logo to the Slide Master (top level) |
| Too many layouts | Confusing for team members | Delete unused, keep 5-8 essential layouts |
| Ignoring footer area | Missing slide numbers, dates | Configure via Insert > Header & Footer |
| Multiple Slide Masters | Conflicting styles within one presentation | Use one master unless intentionally sectioning |
For adding animations to your slides, see our PowerPoint animation tutorial. If you need PowerPoint with full Slide Master and template capabilities, Microsoft Office 2024 Professional Plus ($199.99) includes the complete PowerPoint desktop application.
Frequently Asked Questions
What is the difference between a Slide Master and a template?
The Slide Master is a feature inside PowerPoint that controls the default appearance of slides. A template (.potx file) is a saved file that includes the Slide Master, layouts, and optionally sample slides. When you open a template, PowerPoint creates a new presentation with the Slide Master pre-configured. You edit the Slide Master to design the template, then save it as a .potx file for reuse.
Can I have multiple Slide Masters in one presentation?
Yes. Insert a new Slide Master via Slide Master tab > Insert Slide Master. Multiple masters are useful for presentations with distinct sections (e.g., different branding for different departments). However, using one master is recommended for most presentations to maintain visual consistency.
Will editing the Slide Master change my existing slides?
Yes, for any formatting that inherits from the master. If you change the master font, all slides using theme fonts update automatically. However, any text you manually formatted (e.g., changed color on a specific slide) is not overridden — manual formatting takes priority over the master. This is why using theme fonts and colors is important.
How do I reset a slide to match the Slide Master?
Right-click the slide in Normal view and select Reset Slide. This removes all manual formatting overrides and restores the slide to match its layout from the Slide Master. Note: this also resets placeholder positions, so any manually moved text boxes return to their layout-defined positions.
by Editorial Team
Updated on April 5, 2026
by Editorial Team
Updated on April 5, 2026
ON THIS PAGE