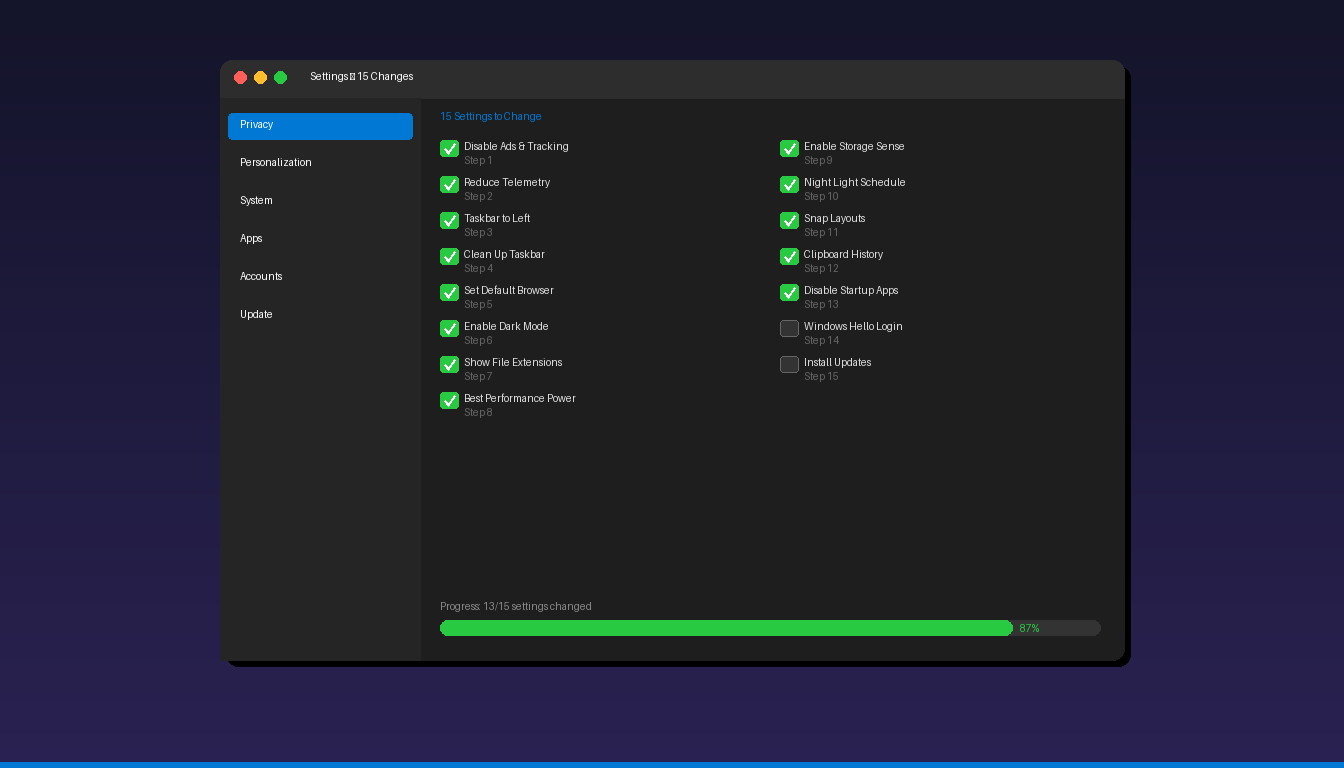
A fresh Windows 11 installation comes with default settings optimized for Microsoft’s ecosystem — not for your productivity or privacy. These 15 changes take about 15 minutes and make Windows 11 faster, less cluttered, and more private. For a complete settings overview, see our Windows 11 settings guide.
Key Takeaways
- Disable the advertising ID and switch diagnostic data to “Required only” under Privacy & security to stop unnecessary tracking immediately.
- Move the taskbar alignment to left, remove Widgets and Copilot, and enable file extensions in File Explorer for a cleaner, more productive workspace.
- Switch power mode to “Best performance” and enable Storage Sense for automatic cleanup to keep your PC running fast from day one.
1. Disable Personalized Ads and Tracking
Settings > Privacy & security > General
Toggle off all four options: – Let apps show me personalized ads — stops ad targeting – Let websites show locally relevant content — stops language tracking – Let Windows improve Start by tracking app launches — stops usage monitoring – Show me suggested content in Settings — removes Microsoft promotions
This is the single most important privacy change. It takes 10 seconds and eliminates the most intrusive default tracking.
2. Reduce Diagnostic Data to Required Only
Settings > Privacy & security > Diagnostics & feedback
- Set diagnostic data to Send required diagnostic data
- Toggle off Improve inking and typing
- Toggle off Tailored experiences
- Click Delete diagnostic data to clear previously collected data
Required data covers only essential system information needed for Windows Update and security. For a deeper dive, see our Windows 11 privacy settings guide.
3. Move the Taskbar to the Left
Settings > Personalization > Taskbar > Taskbar behaviors
Change Taskbar alignment from Center to Left.
The centered taskbar is Windows 11’s most divisive design change. Left alignment places the Start button where decades of muscle memory expect it — in the bottom-left corner.
4. Clean Up the Taskbar
Settings > Personalization > Taskbar
Toggle off items you do not use: – Widgets — removes the news feed widget – Task view — removes the virtual desktop button (still accessible via Win+Tab) – Chat — removes the Microsoft Teams chat icon – Copilot — right-click the icon > Unpin from taskbar
| Taskbar Item | Default | Recommendation |
|---|---|---|
| Search | Show | Change to “Search icon only” |
| Task view | Show | Hide (use Win+Tab) |
| Widgets | Show | Hide |
| Chat | Show | Hide |
| Copilot | Show | Hide (unless you use it daily) |
5. Set Your Default Browser
Settings > Apps > Default apps > [Your browser]
Click your preferred browser (Chrome, Firefox, Edge, Brave) and click Set default. Without this, Windows opens all links in Microsoft Edge regardless of which browser you installed.
6. Enable Dark Mode
Settings > Personalization > Colors
- Change Choose your mode to Dark
- Optionally set Choose your default Windows mode and Choose your default app mode separately for a hybrid look
Dark mode reduces eye strain, saves battery on OLED/AMOLED screens, and is preferred by most users in 2026.
7. Show File Extensions in File Explorer
Open File Explorer > View > Show > File name extensions
By default, Windows 11 hides file extensions (.docx, .pdf, .exe). This is a security risk — a malicious file named “invoice.pdf.exe” appears as “invoice.pdf” when extensions are hidden. Always show extensions.
Also enable: – Hidden items (View > Show > Hidden items) to see system and configuration files
8. Switch Power Mode to Best Performance
Settings > System > Power & battery > Power mode
Change from Balanced to Best performance.
This prevents CPU throttling and keeps your system responsive. On laptops, switch back to Balanced when on battery. For advanced power optimization including the hidden Ultimate Performance plan, see our Windows 11 performance settings guide.
9. Enable Storage Sense
Settings > System > Storage > Storage Sense
Toggle Storage Sense to On and configure: – Run Storage Sense: Every week – Delete files in Recycle Bin older than: 30 days – Delete files in Downloads older than: 30 days (or Never if you prefer manual control)
Storage Sense automatically frees up 10-20 GB on systems that have not been cleaned, keeping your SSD performing well over time.
10. Enable Night Light
Settings > System > Display > Night Light
Toggle Night Light to On and set a schedule (e.g., Sunset to sunrise). Night Light reduces blue light emission from your screen, reducing eye strain during evening hours.
Adjust the Strength slider — 30-50% provides a warm tone without making the screen too orange.
11. Configure Snap Layouts and Multitasking
Settings > System > Multitasking
- Snap windows — keep enabled (hover over maximize button for layout options)
- Show snap layouts when I hover over a window’s maximize button — keep enabled
- Show snap layouts when I drag a window to the top of my screen — enable
- When I snap a window, show what I can snap next to it — enable
Snap Layouts let you organize windows into 2, 3, or 4-pane layouts by hovering over the maximize button — one of Windows 11’s best productivity features.
12. Enable Clipboard History
Press Win+V to activate clipboard history. Click Turn on when prompted.
Clipboard history stores the last 25 items you copied — text, images, and links. Press Win+V to paste from history instead of just the last copied item. You can also pin frequently used items so they persist after restart.
13. Disable Startup Apps You Do Not Need
Settings > Apps > Startup
Review the list and disable apps with High or Medium impact that you do not need at boot. Common apps safe to disable: Microsoft Teams, OneDrive, Spotify, Discord, Adobe Creative Cloud, Skype.
This reduces boot time by 30-50% on systems with many startup apps. See our Windows 11 performance settings guide for a detailed list.
14. Set Up Windows Hello (Biometric Login)
Settings > Accounts > Sign-in options
Configure at least one biometric login method: – Facial recognition (if your device has an IR camera) – Fingerprint (if your device has a fingerprint reader) – PIN (faster than password, device-specific)
Windows Hello is faster and more secure than typing a password. The PIN is stored only on your device and never transmitted to Microsoft servers, unlike your Microsoft account password.
15. Check for and Install Updates
Settings > Windows Update > Check for updates
Install all pending updates, including: – Feature updates – Security updates – Driver updates (expand Optional updates for GPU and hardware drivers)
A fresh Windows installation often has months of pending updates. Installing them immediately ensures you have the latest security patches, bug fixes, and driver improvements.
Quick Reference: All 15 Settings
| # | Setting | Location | Action |
|---|---|---|---|
| 1 | Advertising ID | Privacy > General | Toggle off all 4 options |
| 2 | Diagnostic data | Privacy > Diagnostics | Required only |
| 3 | Taskbar alignment | Personalization > Taskbar | Change to Left |
| 4 | Taskbar clutter | Personalization > Taskbar | Hide Widgets, Chat, Copilot |
| 5 | Default browser | Apps > Default apps | Set preferred browser |
| 6 | Dark mode | Personalization > Colors | Enable Dark |
| 7 | File extensions | File Explorer > View | Show extensions |
| 8 | Power mode | System > Power | Best performance |
| 9 | Storage Sense | System > Storage | Enable weekly cleanup |
| 10 | Night Light | System > Display | Enable with schedule |
| 11 | Snap Layouts | System > Multitasking | Enable all options |
| 12 | Clipboard history | Win+V | Turn on |
| 13 | Startup apps | Apps > Startup | Disable non-essential |
| 14 | Windows Hello | Accounts > Sign-in | Set up PIN or biometric |
| 15 | Windows Update | Windows Update | Install all updates |
If you need a Windows 11 license, Windows 11 Pro ($99.99) includes all features above plus BitLocker encryption, Group Policy Editor, and Hyper-V virtualization.
Frequently Asked Questions
How long does it take to change all 15 settings?
About 15 minutes for all settings. The privacy settings (steps 1-2) take 2 minutes, taskbar and appearance changes (steps 3-6) take 3 minutes, and the remaining settings take 10 minutes. You only need to do this once — the settings persist through updates.
Will changing these settings cause any problems?
No. All 15 changes are safe and reversible. The only setting that could affect functionality is disabling startup apps — if you disable something important (like your antivirus), re-enable it. None of these changes affect Windows stability, updates, or security.
Should I change these settings on a work laptop?
Some settings may be managed by your organization’s IT department through Group Policy and cannot be changed. Privacy settings (steps 1-2), dark mode, and Night Light are usually available. Taskbar customization and default browser changes may be restricted. Check with IT before modifying power settings or disabling startup apps.
Do these settings apply to Windows 11 Home and Pro?
Yes. All 15 settings are available in both Windows 11 Home and Pro editions. The only difference is that Windows 11 Pro includes additional features like Group Policy Editor (for advanced privacy controls) and BitLocker (for disk encryption) that are not covered in this list.