Professional document formatting in Microsoft Word starts with Styles — predefined combinations of fonts, sizes, and spacing that you apply with one click and modify globally across the entire document. Instead of formatting each heading manually, use Word’s built-in styles to create consistent, polished documents in minutes. For Word fundamentals, see our Microsoft Word tutorial for beginners.
Key Takeaways
- Use Styles (Home tab > Styles Gallery) for all formatting — Heading 1 for main headings, Heading 2 for subheadings, Normal for body text. Modifying a style updates all text using it instantly.
- Set margins to 1 inch on all sides (Page Layout > Margins > Normal), use 11-12pt font for body text, and set line spacing to 1.15-1.2 for readable, professional documents.
- Add an automatic Table of Contents (References > Table of Contents) that generates from your heading styles and updates with one click.
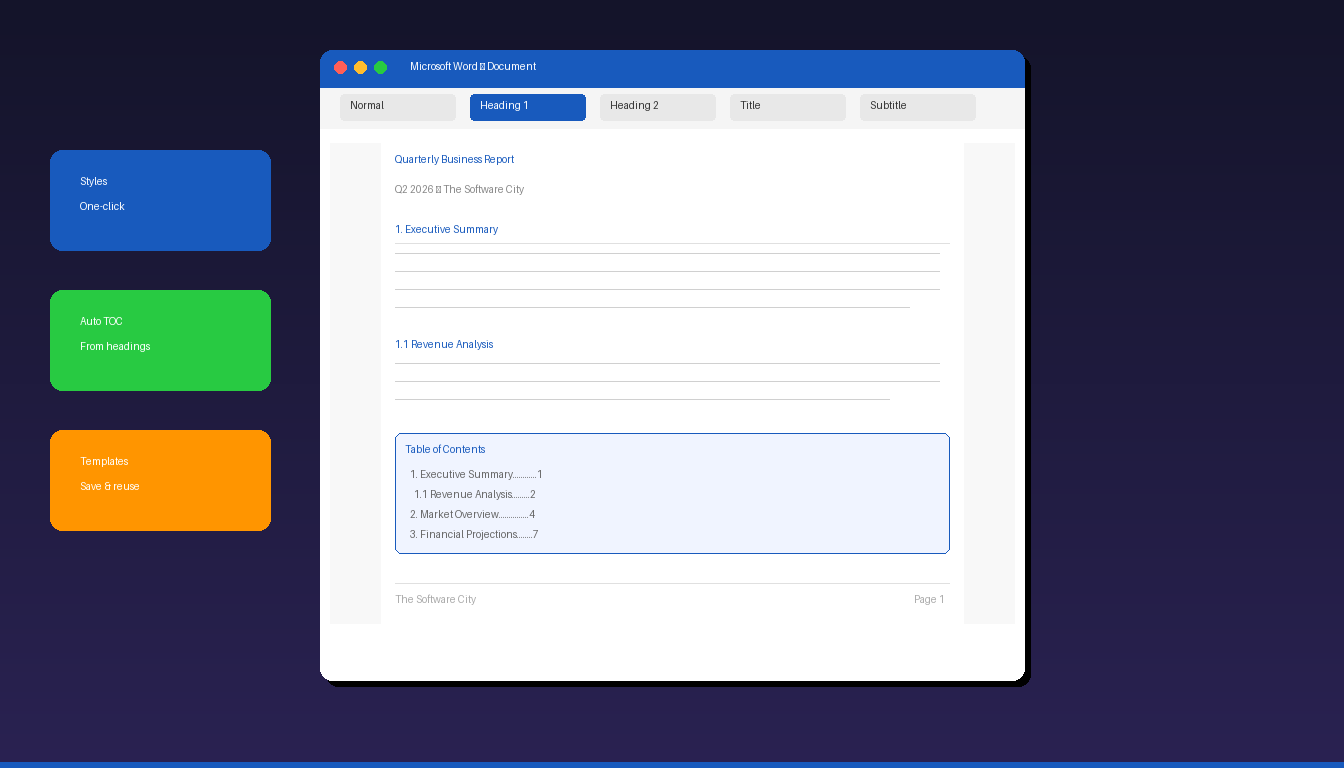
How Do I Use Styles for Consistent Formatting?
Select your text and click a style from the Styles Gallery on the Home tab — Heading 1 for main sections, Heading 2 for subsections, Normal for body text. Modifying any style automatically updates all text using it.
Apply Styles
- Select the text you want to format (or place your cursor in the paragraph).
- Go to Home tab > Styles group.
- Click the appropriate style:
| Style | Use For | Typical Formatting |
|---|---|---|
| Normal | Body text, paragraphs | Calibri/Aptos 11pt, left-aligned |
| Heading 1 | Main section titles | 16pt, bold, accent color |
| Heading 2 | Subsection titles | 13pt, bold, accent color |
| Heading 3 | Sub-subsection titles | 12pt, bold or italic |
| Title | Document title | 28pt, light color |
| Subtitle | Document subtitle | 14pt, gray |
| Quote | Block quotations | Italic, indented |
| List Paragraph | Bulleted/numbered lists | Indented with bullet |
Modify a Style Globally
- Right-click any style in the Styles Gallery.
- Select Modify.
- Change font, size, color, spacing, or alignment.
- Check Automatically update if you want changes to propagate.
- Click OK — all text using that style updates instantly.
This is the single most powerful formatting concept in Word. Instead of changing 20 headings one at a time, modify the Heading 1 style once and all 20 update simultaneously.
How Do I Set Up Page Layout and Margins?
Go to Layout tab > Margins > Normal (1 inch all sides) for standard professional documents — adjust paper size, orientation, and columns from the same tab.
Margins
| Preset | Top/Bottom | Left/Right | Best For |
|---|---|---|---|
| Normal | 1″ | 1″ | Standard documents, reports |
| Narrow | 0.5″ | 0.5″ | Maximizing content space |
| Moderate | 1″ | 0.75″ | Slightly more content width |
| Wide | 1″ | 2″ | Documents with margin notes |
| Mirrored | 1″ | 1.25″/1″ | Bound/printed booklets |
Page Setup
- Paper size: Layout > Size > Letter (8.5″ x 11″) or A4 (default)
- Orientation: Layout > Orientation > Portrait or Landscape
- Columns: Layout > Columns > One, Two, Three, or custom
How Do I Choose Fonts and Spacing?
Use maximum two fonts — one for headings and one for body text — with 11-12pt body size, 1.15-1.2 line spacing, and 6-8pt paragraph spacing for a clean, readable layout.
Font Recommendations
| Heading Font | Body Font | Style |
|---|---|---|
| Calibri | Calibri | Modern, clean (Word default) |
| Aptos | Aptos | New Word default (2024+) |
| Arial | Arial | Universal, highly readable |
| Georgia | Calibri | Traditional heading + modern body |
| Cambria | Calibri | Serif heading + sans body |
Set Line and Paragraph Spacing
- Select all text (Ctrl+A).
- Go to Home > Line and Paragraph Spacing (icon in Paragraph group).
- Select 1.15 or Line Spacing Options for custom values.
- In the dialog, set:
- Before: 0 pt
- After: 6 pt or 8 pt
- Line spacing: Multiple at 1.15 or 1.2
Alignment
Use left alignment for professional documents — not justified. Justified text creates uneven word spacing (“rivers” of white space) that reduces readability. Left alignment keeps consistent letter and word spacing.
How Do I Add Headers, Footers, and Page Numbers?
Go to Insert > Header (or Footer) to add repeating content at the top or bottom of every page — page numbers, document titles, company names, and dates.
Add a Header
- Go to Insert > Header > choose a preset design (or Blank).
- Type your header text (e.g., document title, company name).
- Click Close Header and Footer or double-click the body to return.
Add Page Numbers
- Go to Insert > Page Number.
- Choose position: Top of Page, Bottom of Page, or Page Margins.
- Select a style (Plain Number, With Accent, etc.).
Different First Page
To omit the header/footer on the first page (common for cover pages):
- Double-click the header area to enter edit mode.
- Check Different First Page in the Header & Footer tab.
- The first page header/footer becomes independent — leave it blank.
Section Breaks for Different Headers
For documents with different headers per section (e.g., chapter titles):
- Place cursor at the end of the section.
- Go to Layout > Breaks > Next Page (section break).
- Double-click the header in the new section.
- Uncheck Link to Previous.
- Edit the header for that section independently.
How Do I Create an Automatic Table of Contents?
Go to References > Table of Contents and select a preset — Word generates the TOC automatically from your Heading 1, 2, and 3 styles. Update it with one click when content changes.
Generate a TOC
- Place your cursor where you want the TOC (typically page 2, after the title page).
- Go to References > Table of Contents.
- Choose a preset style (Automatic Table 1 or Automatic Table 2).
- The TOC generates with page numbers linked to your headings.
Update the TOC
After editing your document:
- Click anywhere in the TOC.
- Click Update Table (or press F9).
- Choose Update page numbers only or Update entire table.
The TOC only works if you use heading styles (Heading 1, 2, 3) — manually formatted bold text does not appear in the TOC.
What Are Common Document Formatting Mistakes?
The biggest mistakes are using manual formatting instead of styles, inconsistent spacing, and skipping heading levels.
| Mistake | Impact | Fix |
|---|---|---|
| Manual formatting instead of styles | Inconsistent, hard to update | Always use Styles Gallery |
| Skipping heading levels | Broken TOC, poor accessibility | Use H1 > H2 > H3 in order |
| Justified text | Rivers of white space | Use left alignment |
| Too many fonts | Unprofessional appearance | Max 2 fonts |
| Inconsistent spacing | Cluttered layout | Set in style definition |
| Manual page breaks | Break when content changes | Use “Page break before” in style |
| No section breaks | Cannot vary headers/footers | Add section breaks between sections |
For creating presentations from your documents, see our PowerPoint tutorial for beginners. If you need Word with full formatting capabilities, Microsoft Office 2024 Professional Plus ($199.99) includes the complete Microsoft Word desktop application.
Frequently Asked Questions
What font size should I use for professional documents?
Use 11pt or 12pt for body text and 14-16pt for headings. The default Word font (Calibri 11pt or Aptos 12pt) is appropriate for most business documents. For academic papers, check your institution’s style guide — many require Times New Roman 12pt with double spacing.
How do I make a Word document look professional quickly?
Apply a Document Theme (Design tab > Themes) for consistent colors and fonts throughout. Then use heading styles for all section titles, set margins to Normal (1 inch), add page numbers, and include a header with the document title. These five steps transform any document in under 2 minutes.
Can I save my formatting as a template?
Yes. After formatting your document, go to File > Save As > change file type to Word Template (.dotx). Future documents can use this template: File > New > Personal > select your template. All styles, margins, headers, and formatting carry over.
What is the difference between styles and direct formatting?
Direct formatting changes individual text (bold, font size, color) without using styles. Styles apply predefined formatting to text categories (Heading 1, Normal) and can be updated globally. Always prefer styles — they ensure consistency, enable automatic TOC generation, improve accessibility, and make global changes effortless.