A distribution list in Microsoft Outlook lets you send emails to multiple people at once by typing a single group name instead of adding each recipient individually. Outlook calls these “Contact Groups” in the desktop app and “Contact Lists” in Outlook on the web — both do the same thing. Once you have your groups set up, pair them with Outlook rules to automatically sort incoming group emails into dedicated folders.
Key Takeaways
- In classic Outlook desktop, create a Contact Group via Home > New Contact Group > Add Members from contacts, address book, or manual entry.
- In new Outlook and Outlook on the web, go to People > New contact list to create a group that syncs across devices.
- Contact Groups are personal (only you can use them) — Distribution Groups in Microsoft 365 are organization-wide and managed by IT administrators.
How Do I Create a Contact Group in Classic Outlook?
Open classic Outlook desktop, click Home > New Contact Group, add members from your contacts or address book, and click Save & Close — the group appears in your contacts for use in any email.
Step 1: Open a New Contact Group
- Open Microsoft Outlook desktop.
- Click the People icon (or Contacts) in the navigation bar.
- On the Home tab, click New Contact Group.
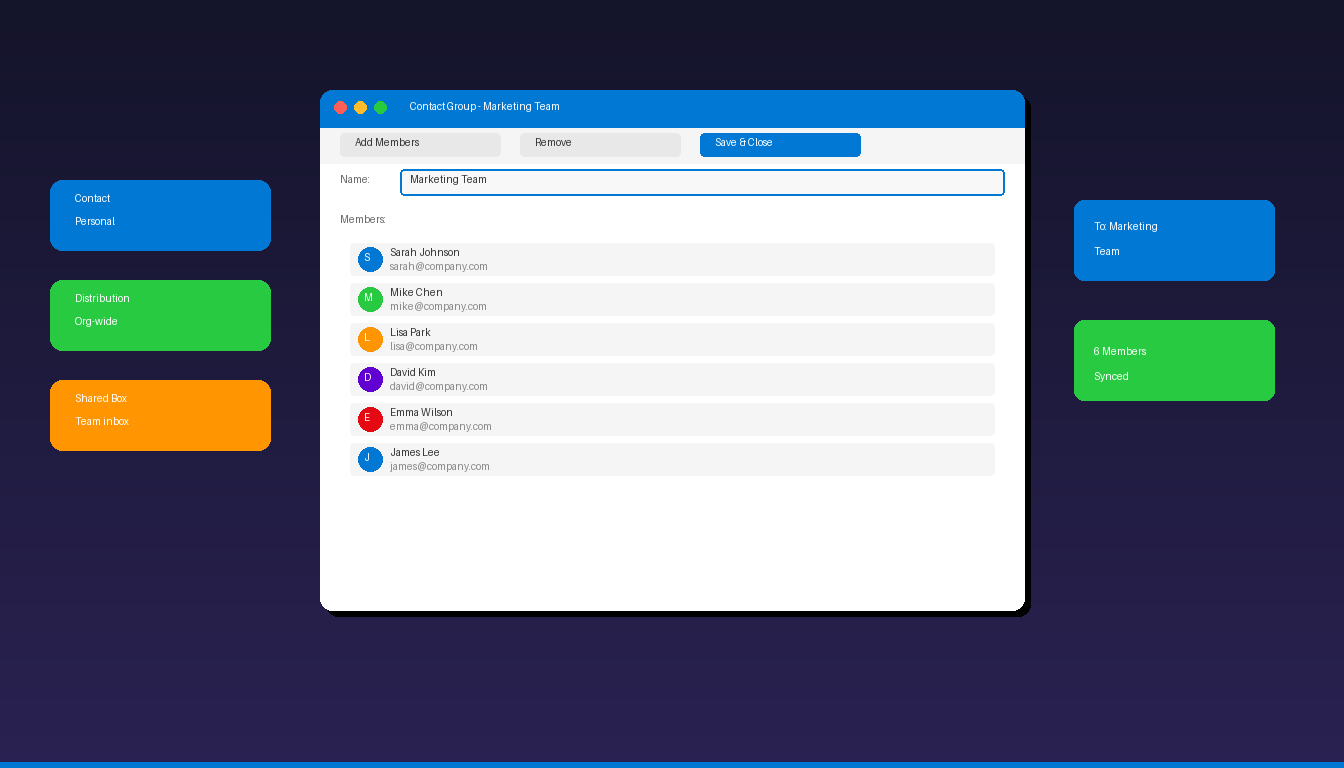
Step 2: Name the Group
- In the Name field at the top, enter a descriptive name (e.g., “Marketing Team” or “Project Alpha”).
- Choose a name that is easy to recognize when typing in the To field.
Step 3: Add Members
Click Add Members in the ribbon to see three options:
| Source | Best For |
|---|---|
| From Outlook Contacts | People already in your personal contacts |
| From Address Book | Colleagues in your organization’s global address list |
| New E-mail Contact | External people not in any address book |
For each option: 1. Search for or type the person’s name or email address. 2. Click Members (or double-click the name) to add them. 3. Repeat for all members. 4. Click OK.
Step 4: Save the Group
Click Save & Close. The Contact Group now appears in your Contacts folder and is available when composing emails.
According to Microsoft Support, Contact Groups are stored locally in your Outlook contacts — only you can see and use them unless you share the contact file.
How Do I Create a Contact List in New Outlook or Outlook on the Web?
In new Outlook or Outlook on the web, go to People, click the dropdown next to New Contact, select New contact list, add members, and click Create — the list syncs across all your devices.
- Open new Outlook for Windows or sign in to outlook.office365.com.
- Click the People icon in the left navigation.
- Click the dropdown arrow next to New contact.
- Select New contact list.
- Enter a name for the list (e.g., “Sales Team”).
- In the Add members field, type each person’s name or email address.
- Outlook suggests matches from your contacts and organization directory — click to add.
- Click Create.
The contact list syncs through your Microsoft account and is available in new Outlook, Outlook on the web, and Outlook mobile.
How Do I Send an Email to a Distribution List?
Type the Contact Group or Contact List name in the To, CC, or BCC field — Outlook expands it to all members when you send.
- Click New Email.
- In the To field, start typing the group name (e.g., “Marketing Team”).
- Outlook shows matching groups — click the one you want.
- The group name appears in the To field. (Click the + icon to expand and see individual members before sending.)
- Write your email and click Send.
All members in the group receive the email. Replies go to you (the sender), not to the entire group — unless recipients use “Reply All.”
To send without revealing all recipient addresses, put the group in the BCC field instead. Each recipient sees only their own address.
How Do I Edit or Update a Distribution List?
Open the Contact Group from your contacts, click Add Members or Remove Member in the ribbon, then Save & Close to update the group.
Classic Outlook
- Go to People (Contacts).
- Find and double-click the Contact Group to open it.
- To add members: Click Add Members and follow the same process as creation.
- To remove members: Select the member and click Remove Member in the ribbon.
- Click Save & Close.
New Outlook / Web
- Go to People.
- Click Contact lists in the left sidebar to filter your lists.
- Click the group you want to edit.
- Click Edit (pencil icon).
- Add or remove members as needed.
- Click Save.
What Is the Difference Between a Contact Group, Distribution List, and Shared Mailbox?
Contact Groups are personal email shortcuts stored in your contacts — Distribution Groups are organization-wide server-side lists — Shared Mailboxes are collaborative inboxes that multiple users can send and receive from.
| Feature | Contact Group | Distribution Group | Shared Mailbox | Microsoft 365 Group |
|---|---|---|---|---|
| Created by | Any user | M365 admin | M365 admin | Any user or admin |
| Scope | Personal (only you) | Organization-wide | Organization-wide | Organization-wide |
| Shared inbox | No | No | Yes | Yes (50 GB) |
| Shared calendar | No | No | Yes | Yes |
| Shared files | No | No | No | Yes (SharePoint) |
| Reply behavior | Replies go to sender | Replies go to sender | Replies go to shared mailbox | Replies go to group inbox |
| New members see history | N/A | No | Yes | Yes |
| Best for | Quick personal groups | Broadcast announcements | Team collaboration | Full team workspace |
When to Use Each
- Contact Group: You regularly email the same 5-10 people and want a shortcut. Only you need it.
- Distribution Group: Your organization needs a company-wide alias like [email protected]. Managed by IT.
- Shared Mailbox: Your team needs a shared inbox like [email protected] where multiple people reply to emails.
- Microsoft 365 Group: Your team needs email, calendar, files, and a Planner board — all in one workspace.
How Do I Create a Distribution Group as a Microsoft 365 Administrator?
Administrators create organization-wide Distribution Groups through the Microsoft 365 admin center — these appear in the global address list for all users.
- Sign in to admin.microsoft.com.
- Go to Teams & groups > Active teams & groups.
- Click Add a group.
- Select Distribution as the group type and click Next.
- Enter a name and optional description.
- Set the group email address (e.g., [email protected]).
- Choose whether people outside the organization can send to this group.
- Add owners and members.
- Click Create group.
According to Microsoft Learn, Distribution Groups are ideal for broadcasting messages to groups of people without needing a shared mailbox or collaboration features.
For managing email workflows with your distribution lists, set up email forwarding rules to automatically route emails from specific groups. If you need Outlook with full Contact Group support, Microsoft Office 2024 Professional Plus ($199.99) includes the classic Outlook desktop application. To personalize your group emails, add a professional signature in Outlook.
Frequently Asked Questions
How many members can I add to a Contact Group in Outlook?
There is no hard limit on Contact Group members in classic Outlook desktop — the group is stored in your local contacts file. However, very large groups (500+ members) may slow down Outlook when expanding the group in the To field. For large groups, use a server-side Distribution Group through Microsoft 365 admin instead.
Can I import a list of email addresses into a Contact Group?
Not directly in Outlook’s Contact Group editor. However, you can import a CSV file of contacts into Outlook (File > Open & Export > Import/Export), then add those imported contacts to a Contact Group using the “From Outlook Contacts” option. This is faster than typing each address manually.
Why can I not find my Contact Group when composing an email?
Make sure you are typing the exact group name in the To field. If the group does not appear, check that it is saved in your default Contacts folder (not a subfolder). In new Outlook, verify you created it as a “Contact list” rather than a regular contact. Also check that the contact source is enabled: File > Account Settings > Address Books.
What happens if someone leaves the organization?
For personal Contact Groups, you must manually remove the person — Outlook does not auto-update. For server-side Distribution Groups managed through Microsoft 365, administrators can remove the member from the group, and the change takes effect organization-wide.