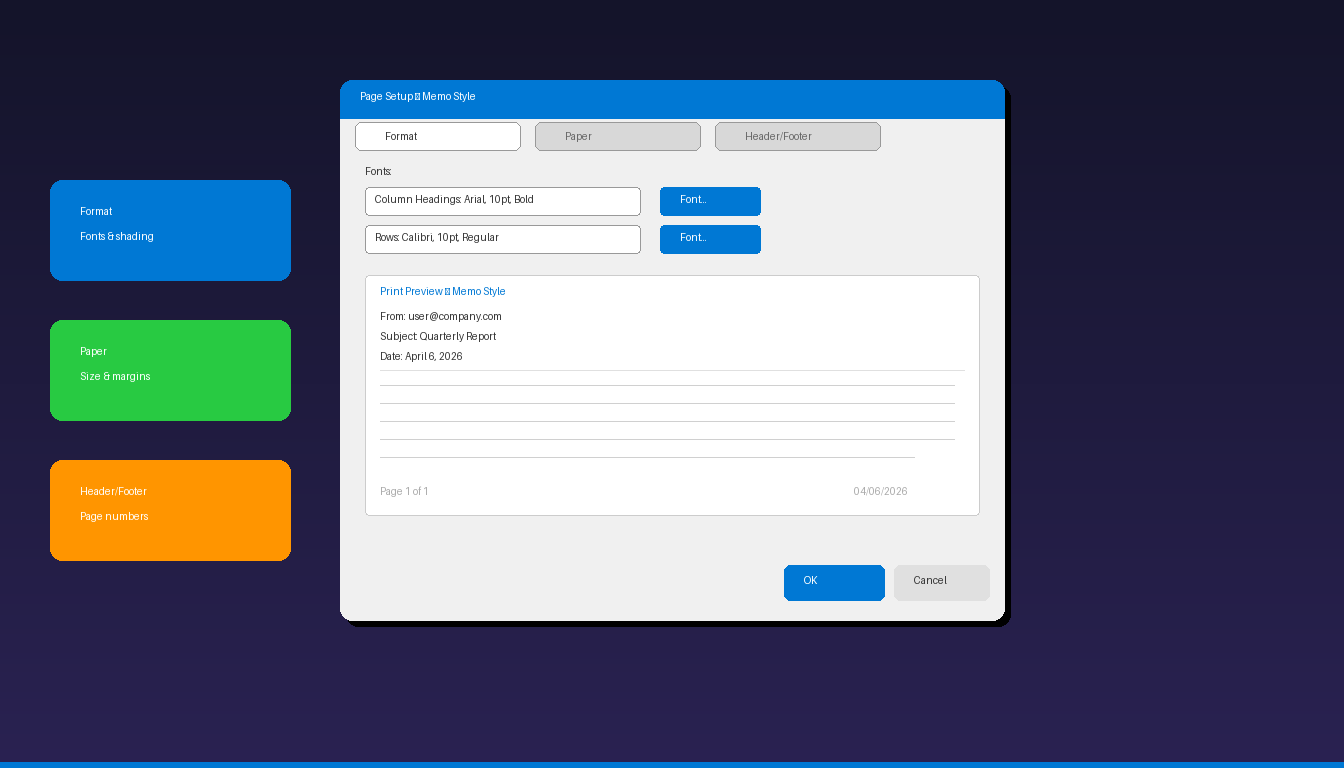
The Page Setup dialog box in Microsoft Outlook controls how emails, calendars, and contacts look when printed — including fonts, paper size, margins, headers, and footers. Customizing these settings ensures your printed Outlook items look professional and fit properly on the page. For managing your email content, see our Outlook email setup guide.
Key Takeaways
- Access Page Setup through File > Print > Print Options > Page Setup in classic Outlook — it contains three tabs: Format, Paper, and Header/Footer.
- The default print style is Memo Style for emails, which prints the sender, subject, date, and message body — you can customize fonts, margins, and headers.
- You can define custom print styles or reset modified styles to their defaults through the Define Styles button in the Print dialog.
How Do I Open the Page Setup Dialog Box?
Go to File > Print, click Print Options to open the Print dialog, then click Page Setup — the dialog opens with three tabs for customizing your print layout.
- Open the email, calendar, or contact you want to print.
- Click File > Print.
- Click Print Options (opens the Print dialog box).
- Click Page Setup (opens the Page Setup dialog box).
Alternatively, from the Print dialog, click Define Styles to see all available print styles, select one, and click Edit to open its Page Setup.
What Are the Page Setup Tabs?
The Page Setup dialog has three tabs — Format controls fonts and shading, Paper controls size and margins, and Header/Footer adds text to the top and bottom of every printed page.
Format Tab
| Setting | What It Controls |
|---|---|
| Fonts | Click to change font, size, and style for different elements |
| Column headings | Font for header labels (Date, From, Subject) |
| Rows | Font for message content and list items |
| Shading | Print gray shading on alternating rows or headings |
| Print using | Default printer font or embedded formatting |
Paper Tab
| Setting | What It Controls |
|---|---|
| Type | Paper size (Letter, A4, Legal, custom) |
| Dimensions | Width and height for custom paper |
| Margins | Top, Bottom, Left, Right margins (in inches or cm) |
| Orientation | Portrait or Landscape |
| Page | Page range options |
Header/Footer Tab
| Setting | What It Controls |
|---|---|
| Header | Text at top of every printed page |
| Footer | Text at bottom of every printed page |
| Font | Header and footer font and size |
| Variables | Insert page number, total pages, date, time, username |
Use these variables in headers/footers:
– &p — current page number
– &P — total pages
– &d — current date
– &t — current time
– &u — username
Example footer: Page &p of &P — Printed &d produces “Page 1 of 3 — Printed 04/06/2026”
What Print Styles Are Available in Outlook?
Outlook includes preset print styles for different item types — Memo Style for emails, Table Style for lists, and Card Style for contacts.
| Print Style | Available For | What It Prints |
|---|---|---|
| Memo Style | Emails | Sender, subject, date, recipients, body text |
| Table Style | Emails (list view) | Column headers + rows (like the inbox list) |
| Card Style | Contacts | Contact cards with photo, phone, address |
| Booklet Style | Contacts | Two-column contact cards |
| Phone Directory | Contacts | Alphabetical phone number list |
| Daily Style | Calendar | One day per page with appointments |
| Weekly Style | Calendar | One week per page |
| Monthly Style | Calendar | One month per page |
| Tri-fold Style | Calendar | Three-panel folded layout |
Each style has its own Page Setup with independent Format, Paper, and Header/Footer settings. To switch styles, select a different style in the Print preview before clicking Page Setup.
How Do I Customize Margins for Printing?
Open Page Setup > Paper tab, change the Top, Bottom, Left, and Right margin values — reducing margins fits more content on the page and prevents text from being cut off.
Fix “Email Cut Off” When Printing
The most common printing issue is email content being cut off on the right side:
- Open Page Setup > Paper tab.
- Reduce the Right margin from 0.5″ to 0.25″.
- Optionally reduce the Left margin to match.
- Click OK and preview the print.
Recommended Margins
| Use Case | Top | Bottom | Left | Right |
|---|---|---|---|---|
| Standard email | 0.5″ | 0.5″ | 0.5″ | 0.5″ |
| Fit more content | 0.25″ | 0.25″ | 0.25″ | 0.25″ |
| Wide emails/tables | 0.5″ | 0.5″ | 0.25″ | 0.25″ |
| Binding (left) | 0.5″ | 0.5″ | 1.0″ | 0.5″ |
How Do I Change the Print Font in Outlook?
Open Page Setup > Format tab, click the font button next to the element you want to change — set the font family, size, and style for headings and body text independently.
- Open Page Setup > Format tab.
- Click the Font button next to:
- Column headings (for Memo header labels: From, Subject, Date)
- Rows (for message body content)
- Choose font, size, bold/italic, and color.
- Click OK.
Recommended Print Fonts
| Element | Font | Size | Style |
|---|---|---|---|
| Column headings | Arial or Calibri | 10pt | Bold |
| Body text | Arial or Calibri | 10pt | Regular |
| Headers/Footers | Arial | 8pt | Regular |
Using 10pt instead of the default 8pt makes printed emails significantly more readable, especially for recipients who prefer larger text.
How Do I Reset or Define Custom Print Styles?
Open the Print dialog, click Define Styles, select a style and click Edit (to customize) or Reset (to restore defaults) — you can also copy an existing style to create a new custom style.
Reset a Modified Style
- Go to File > Print > Print Options.
- Click Define Styles.
- Select the style you modified.
- Click Reset > OK.
- The style returns to Outlook’s defaults.
Create a Custom Print Style
- Go to Define Styles > select an existing style > click Copy.
- Name the new style (e.g., “Compact Email Print”).
- Customize Format, Paper, and Header/Footer tabs.
- Click OK.
- Your custom style appears in the Print dialog style list.
Note: Page Setup and custom print styles are only available in classic Outlook desktop. The new Outlook for Windows uses a simplified print interface with fewer customization options.
For other Outlook features, see our Outlook rules setup guide and Outlook archive setup guide. If you need Outlook with full print customization, Microsoft Office 2024 Professional Plus ($199.99) includes the classic Outlook application.